The new version of TILT!Audio firmware features better support for altsound sound packs and lua scripting support.
What is lua scripting?
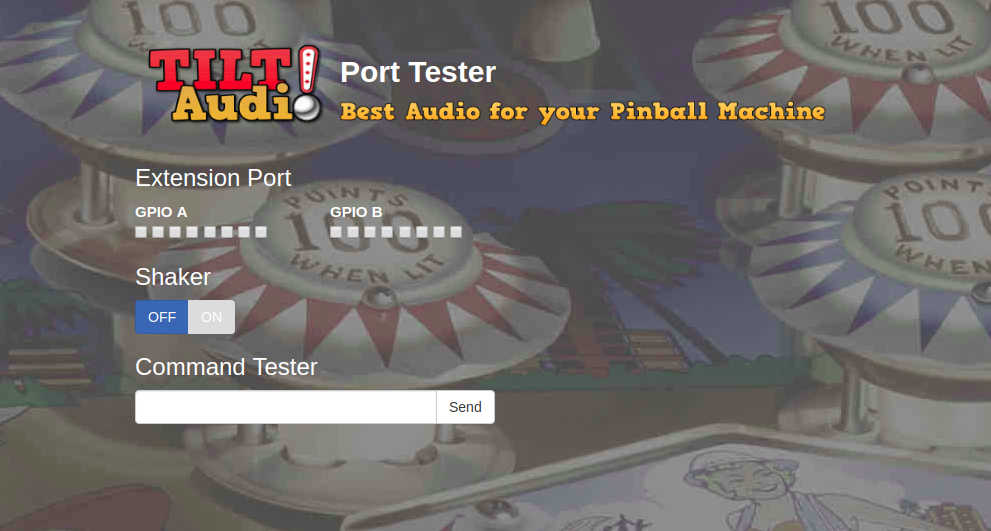
In previous version there were already some command attached to a sound effect, either to control an attached shaker or the new port extender starting with 1.28 to control up to 16 additional GPIO ports directly with the TILT!Audio board.
Now lua scripting takes this to the next level. A command attached to a sound effect is per default simply passed to a lua script interpreter (see https://www.lua.org/). Lua script is a super easy to learn script language that lets you “program” what should happen when a certain sound effect gets played.
So everything you can do with special commands (control shaker, control GPIO, control serial media server, control various i2c devices e.g. ProMiniExtender) you can now also do with lua functions. Addtionally you can play additional sound effects or change volume all controlled by your lua script.
In order to make this work, TILT!Audio loads a lua script at startup (init.lua) that is located at the root directory of your sound pack, where you define all functions your going to use with your sound effects.
Example
Lets make an example:
|
1 2 3 4 5 6 7 8 9 10 11 12 13 14 |
-- -- this is the init.lua file with the sound pack -- -- get shaker pin from main config pinShaker = config.pin_shaker -- define a function that activates shaker (on / off sequence) -- only if a certain background music is playing function shakeOnMultiball() if musicPlayingId == 0x12 then portseq( pinShaker, 100, 200, 100, 100 ) end end |
Now in the webUI choose the sound effect that should trigger the shaking …
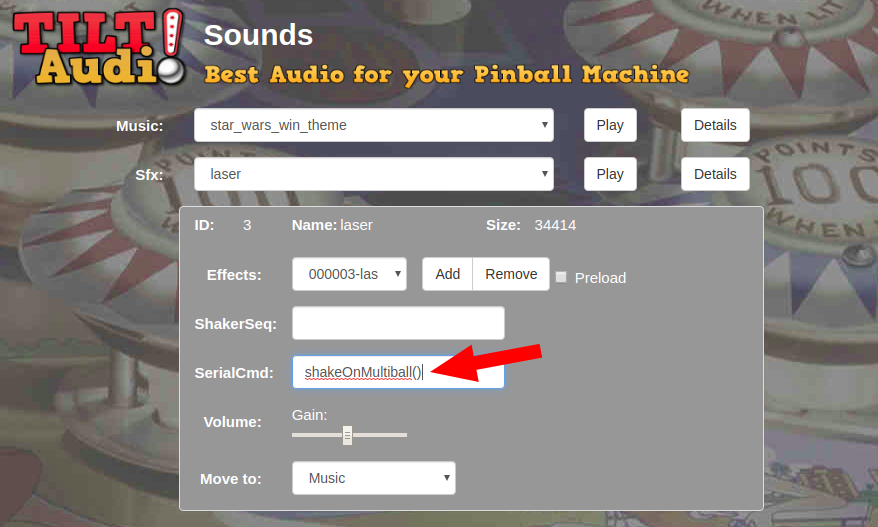
As you can see the shakeOnMultiball checks which background music is playing and activates the shaker only if a certain music is playing. But this is just an example.
From lua you also can control custom sound playback:
Example: use a dummy sound file that actually contains only a second silence, but triggers a lua function:
|
1 2 3 4 5 6 7 8 9 10 11 12 13 14 15 16 17 18 19 |
-- init random generator math.randomseed( os.time() ) -- remember if drain sound was played ballDrained = 0 -- lua function to do custom sound handling function playRandomEffect() ballDrained = ballDrained + 1 soundEffectId = math.random(1000, 1004) soundHandler( soundEffectId ) end function playLooser() if ballDrained > 2 then soundHandler( 1010 ) ballDrained = 0 end end |
In this example we use addtional sound effect ids 1000-1004 and 1010 that the game normally don’t use (choose an arbitray high number). We create a matching row in altsound.csv (or directory in classic dir structure) and put the WAV files there.
The we call the lua functions like shown above and we will hear a random sound with the first function while the drain ball counter is increased. If playLooser sound triggers we play a “looser” sound if the was to many drained balls.
Of course this example requires the game to send the right trigger sounds when ball passes e.g. the outlane.
Tutorial video
I recorded a short video to demonstrate, what you can do with lua scripting. This will also be shown with light controller in my MSF later this month.
Lua reference (all TILT!Audio lua functions and variables) can be found here.