
License
You can run TILT!Audio for testing without any restrictions, but from time to time you will hear a “please register” announcement. Just write down the serial number and order your license here. Copy your license file into the data directory.
Files on sd card / usb stick
There are 4 types of files you can provide:
- License files
- Update files
- Config files
- Sound data
No matter if you use sd card or usb stick the directory structure is always the same. There’s 4 directories:
- data directory
- update directory
- data/sound directory
- data/sound/<soundset-name>
The license file has the name <serialno>.key and needs to be copied into the data directory.
The update zip file needs to be placed into the update directory with the name “update.zip”. For windows users make sure that you not name it update.zip.zip just because you have your explorer not showing file extensions.
The data/sound directory store the main configuration file “raspisound.ini” that stores all the soundset independent settings. It also holds up to 10 subdirectories containing the soundsets. Alternatively a soundset can also be in just one xsnd-File in the data/sound directory.
Soundset that come as zip file needs to be extracted, each in a separate sub directory.
The soundset itself contains all the sound samples itself in a directory structure by effect category (music, sfx, voice …) and a soundset specific configuration file “config.raspisnd” (or config.ini for compatibility reasons). See config options below.
Networking
In order to access the fancy web ui, you need to connect to the pi via wifi. Latest firmware automatically opens an access point with network “TILTAUDIO” Connect to that network using the password “tiltaudio”. After successful connection go to http://192.168.42.1:31008/ and you should see the web ui.
Sound: builtin, usb, hdmi or i2s
Depending on the RaspberryPi model you are using there’s many options on how to generate sound.
Builtin
For all Pi3 models you can use the builtin sound device where amplifiers are connected to the audio jack on the pi board itself. When doing so, you normally don’t (and cannot use) the on board amplifiers but rather connect audio jack to an external amplifier.
Usb
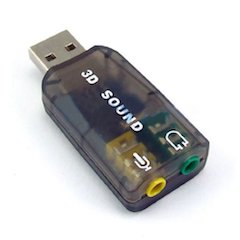
Use usb sound cards like this one either because PiZero doesn’t have builtin sound, or because you want to remove noise or increase quality compared to builtin. Like with builtin you should than connect any external amplifier to the audio output, as the internal ones cannot be used with use sound.
hdmi
The hdmi output connector can also be used for digital sound output. In this case you need to connect an external amplifier via hdmi that is capable of decoding the digital sound. With TILT!Audio you can even use DD5.1 sound given you have a supporting sound pack and an av-receiver-amplifier / speaker set that can be used for output.
i2s (default)
I2s is the default configuration as the latest shield comes with a i2s DAC that directly connects to the amplifiers as default. The i2s interface is natively supported by raspberry pi and produces hifi level sound quality together with as 5102 DAC.
bluetooth (new)
You can pair your TILT!Audio board with any bluetooth device (speakers or headphones, a2dp profile) to get high quality audio directly on your BT-device. Play your game full throttle without disturbing you neighbours 🙂
Configuration
The web UI is documented in an extra page.
For those who are more the console / text file guy here is the configuration file:
|
1 |
say_version=0/1 # announce firmware version<br><br>say_preload=0/1 # announce preloading of sounds<br><br>say_mode=0/1 # announce mode/vendor <br><br>play_boot=0/1 # since version 1.5, skip boot sound <br><br>preload=0/1 # since 1.5, controls sample preloading in memory <br><br>vendor=0-7 # 0=dataeast, 1=wpc, 5=wpcdcs, 7=whitestar <br><br>log_level=0-4 # 0=nothing ... 4=debug <br><br>sample_pool_size=<size of poolsize in MB> <br><br>preload_threshold=<size of sample in byte> #if bigger, do preload<br><br>attract_timeout=<time in ms until fade out> <br><br>shaker_active_low=0/1 # if set invert shaker control: LOW->ON<br><br>shaker_enabled=0/1. # enable direct shaker control (via GPIO)<br><br>pin_shaker=8/36. # with GPIO pin to use. as pin 8 conflicts with TX from serial port, newer boards use pin 36<br><br>enable_serial=0/1 # switch serial port support on/off (for extensions)<br><br>serial_baud=<baud rate> #baud rate on serial port. default is 57600<br><br>serial_device=<dev name> #name of serial device to use. default: /dev/ttyS0<br><br>suppress_repeated=0/1 # if set, repeated commands asking for the same sample are suppressed<br><br>stop_cmds=<comma sep list of stop byte cmds><br><br>loop_music=0/1 # if set background music will loop until stop cmd<br><br>channels=2/6 # number of channels for sound output (SDL init param)<br><br>frequency=44100/48000 #frequency for sound output (SDL init param) use 48000 with 48kHz DAC<br><br>enable_lua=0/1 #switch on/off the embedded lua script interpreter<br><br>enable_i2s=0/1 #switch on digital sound output via i2s. Default on for all newer boards<br><br>enable_port_extender=0/1 #switch on support for onboard mcp23017, recent boards don't support mcp23017 anymore<br><br>enable_dataeast_volume=0/1 #switch on legacy data east volume pot sensing. new boards use an ADC for that<br><br>dataeast_volume_offset=<number> # use for pot sensing adjustments<br><br>enable_minidisplay=0/1 #switch on/off OLED status display<br><br>sms_address=<ip address/hostname> # for serial media server extension: TCP address<br><br>sms_port=<port number> #for serial media server extension: TCP port (see below)<br> |
Per Soundpack configuration
In addition to the global config explained in the previous chapter there is also a “per sound pack” configuration the resides in the config.ini file in the sound packs base directory (not for altsound). Again you can easily setup all the configs via the web UI, but if you would like to look into the config file:
|
1 |
ducking_voice=0-100<br>ducking_sfx=0-100<br>ducking_jingle=0-100<br>dunking_single=0-100<br>gain_music=1-30<br>gain_sfx=1-30<br>gain_voice=1-30<br>gain_single=1-30<br>gain_jingle=1-30<br>fade_sfx_on_music_change=0/1<br>fade_sfx_on_music_change_time=2500<br>shaker_enabled=0/1 |
The first „ducking_xx“ settings controlling the „ducking“ or lowering of the background music when a sample of a specific type is played. e.g. if ducking_voice is set to 80 this means that background music volume is lowered to 80% while voice callouts are playing.
The „gain_xx“ settings control the overall weight of the sample types for this sound set.Gain settings range from 1 to 30, where 15 is the default. So if you want sample type sfx louder go above 15. So if you want to have voice louder compared to background music, you can e.g. set gain_music=11 and gain_voice=24. This was formerly achieved by putting a gain.txt (see below) file in the respective subdirectory itself, but its now consolidated in one ini-File.
As soon as the sample is over volume of background music goes back to 100%.
fade_sfx_on_music_change / -time controls wether on background music change a running sfx is faded out or not. Additionally you can also set the fading time in milli seconds. There are soundset that use rather long sfx samples, so it makes sense to fade the sample until the music track changes.
Coin door buttons
On WPC games you can switch to the next sound pack, by bringing the volume down to zero and then press “vol -” button once again. Of course you need to have more than just one sound pack installed on your sd card.
If you press the “vol -” button 2 times it will switch to the next but one sound pack and so on.
If you press it 5 times it will switch into a shuffling mode, where the sound pack is automatically switched to the next every 3 minutes.
To turn shuffling off, simply once again bring volume down to zero and press one time to switch sound packs.
Button functions
The mini push button right to the OLED display has 3 functions, depending on how long you press it:
- short (<300ms): cycle soundset
- medium (300 – 1000ms): cycle audio device
- long (>1000ms): reboot the board
Altsound format
From the virtual pinball community there are a lot of sound packs available in the “altsound format”, which is basically just a csv file (a table) and a set of soundfiles. All the information about sound effect type, cmd number, ducking, gain and so one is store in the one csv file, therefore no additional config.ini (as above) is needed.
TILT!Audio has full support for altsound sound packs. You can find various sound pack on http://altsound.vpin24.com.
Shaker
If you like to attach an additional shaker in your pinball machine you can control it with TILT!Audio. For each sound effect you can switch the shaker on for a certain amount of milliseconds. Either you define just a one time switch on time or you define a sequence of times, where the output gets switched on and off.
The output pin itself and also the “polarity” shaker active on high output (or low) can be configured in the main settings.
The connector for shaker is in the latest revision of the shield on the right side, see connector info below.
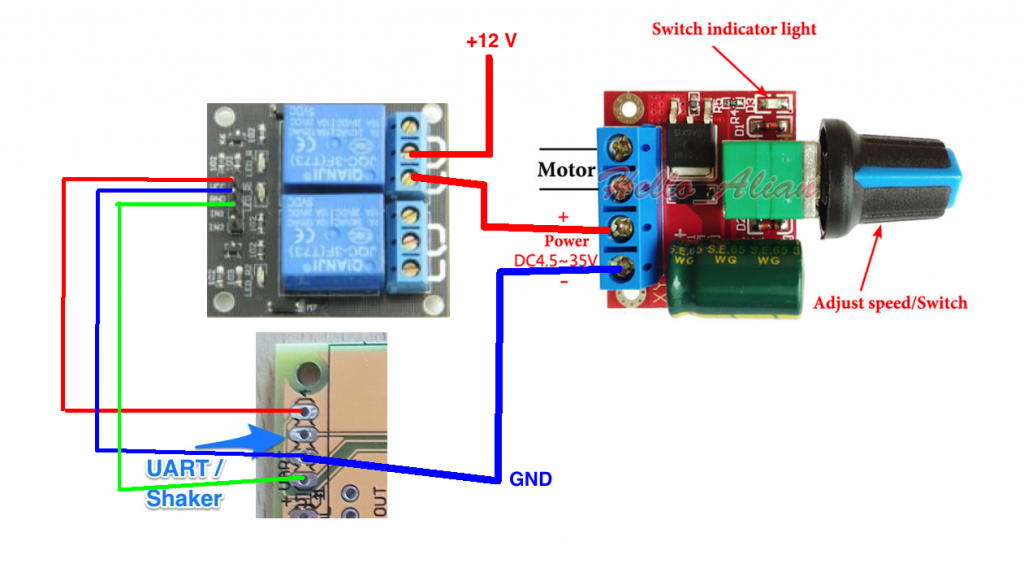
Beside the shaker itself you need a PWM controller to limit the speed of the shaker motor and also one of these small relay moduls with enough power to control the shaker current.
Update: there is a new possibility to control shaker motors directly including speed and ramp up / down see https://tiltaudio.com/2020/11/14/shaker-control-with-pwm/
Adding secondary media
Additionally the the shaker output pin there also a serial interface exposed at the extension connector. Using the configuration web ui you can define a serial command sequence of bytes that are send through the serial port when the respective sound effect gets triggered. Together with the serial-media-server you can play movies or display picture, which is only one application possible with serial commands. There’s a video that show’s how this works in a CFTBL with a holo replacement monitor under the playfield.
Which raspberry pi can I use?
Recommended is raspberry pi 3 (or 3 B+), but pi 3 A or pi 4 also works. Most common is Pi3 these days and this is also the best tested pi version. PiZero is a bit short in memory and cpu power, but is still confirmed from some users to work well with TILT!Audio.
Is it possible to try out the firmware or to prelisten a soundpack?
Yes this is possible. A soundpack is basically only a set of regular audio files (ogg or wav) that can be played on your computer. Also you can install the TILT!Audio firmware on a raspberry pi without a pinball machine and without the TILT!Audio board.
Doing so enables the web UI that allows testing of all sounds and also testing of commands and additional extension (e.g. shaker). If you even have a recording of a game session, you can hear a real session with new sound. Although these recordings are only rarely published.
Assembling
What do I need
- TILT!Audio kit
- Soldering iron
- Solder
- Speaker cable
- optional: external amplifier
- optional: additional power supply
See Assembly page. Also there is an new Quick Start page
Speaker wiring
For old wpc systems speakers are only mono and speaker wire is daisy chained. TILT!Audio brings full stereo and therefore wiring must be changed see here on extra page.
Debugging
If nothing else helps, you can get the logfiles for the current session directly from the web ui and inspect in detail what is happening. You will see every sound command coming from the main cpu and all other logfile information.
You can even connect via ssh to the raspberry pi where TILT!Audio is running on. Networking needs of course activated for this. You then can simply connect via ssh pi@<your-ip> (or putty on windows), the default password is “raspberry“.
If everything is fine the should be a system service running called “tiltaudio”. You can check by “sudo systemctl status tiltaudio”. If you want to experiment and test for yourself you can stop the service with “sudo systemctl stop tiltaudio” and the switch to directory /home/pi/despi and discover the various options with “./despi -h”.